Overview
The Expose Integration API is how C-Bridge lets external systems — other lighting control platforms, AV/control systems (Crestron, AMX, Control4), BMS platforms, or custom software — read and control C-Bridge's devices, scenes, and energy data. It is the API surface for third-party integration partners, distinct from the local Gateway REST/WebSocket API used by C-Bridge's own dashboards.
This page uses Crestron as a worked example throughout, but the same flow applies to any third-party lighting or building system.
How It Works
- A C-Bridge admin (using their own login) registers the third-party system as an integration and grants it scoped permissions (operation groups:
monitor,read,control). - C-Bridge issues that integration a dedicated vendor credential — a credential ID and API key.
- The third-party system uses that vendor credential (not the admin's login) to call C-Bridge's vendor-facing endpoints directly and read or control only the devices it's been given access to.
- The admin controls exactly which devices/scenes are exposed via an allow-list, and can rotate or revoke the credential at any time.
| Actor | Credential | Endpoints Used |
|---|---|---|
| C-Bridge admin / developer managing the integration | Bearer JWT from /api/auth/login | /api/integrations/* |
| Third-party system (e.g. Crestron) | Vendor credential ID + API key issued in step 2 | /api/vendor/* |
See Authentication for the full token/credential details.
What a configured integration looks like
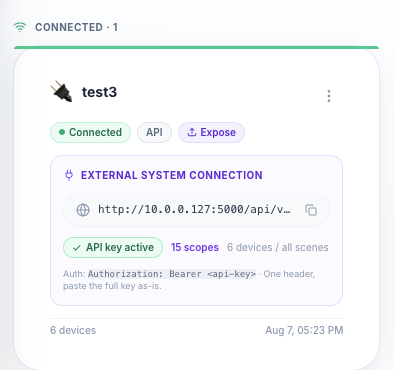
A configured expose integration in Settings → Integrations. The card shows the external base URL, that the API key is active, its scope count and device exposure, and the exact auth header a partner system sends — one Authorization: Bearer <api-key> header, the full key pasted as-is.
Base Configuration
| Item | Value |
|---|---|
| Base URL | http://<gateway-ip>:5000/api — the same gateway host as the Gateway REST API (see API Reference). Replace <gateway-ip> with your C-Bridge device's IP address or hostname (e.g. cbridge.local). |
| Content-Type | application/json |
Tutorial: Connect a New Third-Party System
Follow these steps in order. Each step's response feeds the next (IDs and tokens are chained).
1. Log in as an admin
POST /api/auth/login
{
    "email": "you@example.com",
    "password": "your-password"
}
Response includes tokens.accessToken — use it as Authorization: Bearer <accessToken> for every call below in steps 2–15.
2. Create the integration
POST /api/integrations
{
    "name": "Crestron Test",
    "intent": "expose",
    "protocol": "HTTP",
    "authType": "Bearer Token",
    "scopes": ["monitor", "read"]
}
| Field | Description |
|---|---|
name | Friendly label for the integration |
intent | "expose" — C-Bridge is exposing its own data/control to this system |
scopes | Operation groups granted: monitor, read, control — grant only what the integration needs (see Permission model below) |
Response returns data.key (the integration ID), data.vendorCredentialId, and data.apiKey — save all three. The credential ID and API key are what the third-party system will use to authenticate against /api/vendor/*.
3. List integrations
GET /api/integrations — returns all registered integrations for your account.
4. Update the integration
PUT /api/integrations/:id
{
    "name": "Crestron Test v2",
    "scopes": ["monitor", "read", "control"]
}
5. Test the connection
POST /api/integrations/:id/test-connection — verifies the integration is reachable and correctly configured. A healthy response returns data.status: "connected".
6. Sync the integration
POST /api/integrations/:id/sync — refreshes the set of devices/scenes associated with this integration.
7. View the integration's devices
GET /api/integrations/:id/devices — returns the devices available to this integration (admin view, using your login token).
8–10. Control device exposure (allow-list)
GET /api/integrations/:id/allowed-devices — view which devices/scenes are currently exposed to this integration.
PUT /api/integrations/:id/allowed-devices — set the exposure scope:
- Whitelist mode — expose only specific devices:
{
    "deviceIds": ["<deviceId>"],
    "sceneIds": []
}
- Unrestricted mode — expose all devices (empty arrays):
{
    "deviceIds": [],
    "sceneIds": []
}
This is the core export control: it determines exactly which C-Bridge devices and scenes the third-party system can see and act on via /api/vendor/devices and /api/vendor/scenes, independent of what devices exist on the gateway.
11. Rotate the credential
POST /api/integrations/:id/regenerate-token — issues a new API key for the integration (returned as data.apiKey). Use this if a credential is suspected compromised, without having to recreate the whole integration.
12–14. Monitor the integration
GET /api/integrations/:id/health — connection/health status.
GET /api/integrations/:id/events?limit=20 — recent integration activity.
GET /api/integrations/:id/audit-logs?limit=50 — audit trail of changes to the integration.
15. Remove the integration
DELETE /api/integrations/:id — revokes the integration and its vendor credential immediately.
The Vendor API — What the Third-Party System Calls
Once an integration exists, the third-party system authenticates with its own vendor credential (not the admin login) and calls these endpoints directly. See Authentication for the exact header format.
| Endpoint | Method | Purpose |
|---|---|---|
/api/vendor/me | GET | Verify the credential and list its allowed/denied operations |
/api/vendor/devices | GET | List devices exposed to this integration (respects the allow-list) |
/api/vendor/devices/:id | GET | Full device record (includes model and other metadata) |
/api/vendor/devices/:id/state | GET | Current device state |
/api/vendor/devices/:id/control | POST | Send a control command (see body formats below) |
/api/vendor/scenes | GET | List scenes exposed to this integration |
/api/vendor/scenes/:id/activate | POST | Activate a scene |
/api/vendor/energy | GET | Energy summary (data.readings) |
/api/vendor/energy/history | GET | Historical energy logs — filter with ?from=/?to= (ISO 8601) or ?deviceId= |
/api/vendor/health | GET | Bridge health — data.onlineDevices, data.uptimeSeconds |
Control Command Bodies
All sent to /api/vendor/devices/:id/control:
| Action | Body |
|---|---|
| Turn on | {"power": true} |
| Turn off | {"power": false} |
| Dim to 75% | {"level": 75} |
| Set colour temperature | {"level": 80, "colorTemp": 4000} |
| Set RGB colour | {"r": 255, "g": 100, "b": 0} |
ℹ️ Field names: the Vendor API accepts either level or brightness (both 0–100); level is canonical. Power can be sent as power or on (boolean). The Gateway REST API (see API Reference) uses brightness.
Quick Start & Testing
A short path from zero to a working, tested integration. Uses curl; any HTTP client works. Replace <gateway-ip> with your gateway's address.
A. Create the integration in the UI — Go to Settings → Integrations → Add Integration → Custom Integration → Expose C-Bridge API. Give it a name, choose an auth type, tick the devices/scenes to expose and a permission preset (Read Only, Operator, or Admin), and Save. C-Bridge displays the API key once — copy it immediately.
B. Or create it via the admin API — steps 1–2 of the tutorial above. The POST /api/integrations response returns data.apiKey in the form <credentialId>.<secret>.
C. Verify the credential
curl -s http://<gateway-ip>:5000/api/vendor/me \
  -H "Authorization: Bearer <apiKey>"
A 200 means auth works; the body lists the operations and devices this key may use.
D. Read devices
curl -s http://<gateway-ip>:5000/api/vendor/devices \
  -H "Authorization: Bearer <apiKey>"
E. Control a device
curl -s -X POST http://<gateway-ip>:5000/api/vendor/devices/<deviceId>/control \
  -H "Authorization: Bearer <apiKey>" \
  -H "Content-Type: application/json" \
  -d '{"power": true, "level": 60}'
{
  "success": true,
  "data": {
    "deviceId": "...",
    "deviceName": "Cafe Window Lights",
    "controlData": { "power": true, "dimmer": 60 },
    "message": "Control command sent successfully"
  }
}
F. Activate a scene
curl -s -X POST http://<gateway-ip>:5000/api/vendor/scenes/<sceneId>/activate \
  -H "Authorization: Bearer <apiKey>" -H "Content-Type: application/json" -d '{}'
Testing checklist
| Test | Expected response |
|---|---|
No Authorization header | 401 · MISSING_AUTH_HEADER |
| Wrong or rotated key | 401 · CREDENTIAL_INVALID |
Empty control body {} | 400 · CONTROL_DATA_REQUIRED |
| Unknown device or scene ID | 404 |
| Action outside the credential's grant | 403 · OPERATION_DENIED |
ℹ️ The 403 OPERATION_DENIED code is also listed in Authentication's Vendor Credential Errors table.
Permission model
A credential's scopes resolve to three operation groups. GET /api/vendor/me returns the exact map for any key.
| Operation | Grants access to |
|---|---|
monitor | GET /devices, /devices/:id/state, /health, /energy |
read | GET /devices/:id, /scenes, /energy/history |
control | POST /devices/:id/control, /scenes/:id/activate |
Grant only what the integration needs: Read Only = monitor + read; Operator adds control.
Importing & Exporting Devices
There are two distinct device-visibility mechanisms in C-Bridge — don't confuse them:
| Mechanism | Direction | Where |
|---|---|---|
| Casambi device import | Pulls devices from the physical Casambi lighting network into C-Bridge itself | Gateway-level, covered in Casambi Setup → Device Import |
| Integration device export (allow-list) | Controls which of C-Bridge's already-imported devices/scenes are exposed outward to a given third-party integration | Expose Integration API — /api/integrations/:id/allowed-devices (steps 8–10 above) |
In short: devices are imported from Casambi into C-Bridge first, then selectively exported to third-party systems via the allow-list. A sync (step 6) refreshes the integration's view of what's importable/exportable.
Credential Lifecycle & Housekeeping
- Rotate credentials regularly and immediately after any suspected exposure — see Regenerate API Key (step 11).
- Monitor
health,events, andaudit-logsfor each integration to catch failures or unexpected activity early. - Delete integrations that are no longer in use — this immediately revokes the vendor credential.
Error Handling
Vendor API errors return a code field you can match on programmatically, in addition to the HTTP status:
| HTTP Status | code | Meaning |
|---|---|---|
| 401 | MISSING_AUTH_HEADER | Request to /api/vendor/* is missing the Authorization header |
| 401 | CREDENTIAL_INVALID | API key is invalid, wrong, or has been rotated/revoked |
| 400 | CONTROL_DATA_REQUIRED | POST .../control sent with an empty {} body |
| 404 | — | Device or scene ID does not exist or isn't exposed to this integration |
| 401 | — | Admin route (/api/integrations, etc.) called with no Authorization header |